Previous articles of this series:
Windows SharePoint Services - first setup
SharePoint Services - setting up a Website with Forms Authentication
There are a lot of tools available to help you build up and deploy new SharePoint solutions, the two biggest are:
- STSDEV - http://www.codeplex.com/stsdev
- VSeWSS - look for it at http://blogs.msdn.com/sharepoint/default.aspx
Both those tools help you generate a valid Visual Studio 2005/2008 solution to successfully develop and deploy SharePoint extension projects.
But being a newbie in SharePoint and WSS development I believe it’s better to keep things simple and start from the scratch with a very basic project and do everything by hand.
The following links present some very good guides that allow you to develop a Web Part in a workstation machine (WinXP/Vista) without the need of a SharePoint or WSS installed.
Remote WebPart Development for MOSS 2007
Remote Development, Deployment, and Remote Debugging your first SharePoint 2007 Program
How to get Remote Debugging work properly
To develop a Web Part in Visual Studio you basically have to copy all the SharePoint library assembly from the Server machine to the Dev Machine (the one with Visual Studio installed); those files can be found inside the path: “C:\Program Files\Common Files\microsoft shared\Web Server Extensions\12\isapi”.
Create the corresponding folder in your dev machine and copy only the files that match the pattern: Microsoft.SharePoint.*.dll.
To allow Visual Studio to correctly resolve the assembly reference if you use the above mentioned tools to generate your projects you have to install those assembly to the GAC too (use the standard gacutil.exe to perform the task).
To keep things simple I’ll skip all the step needed to create setup projects for Web Parts and we do all the steps by hand, as said before almost anything can be automated using STSDEV or VSeWSS.
If you do not have a domain with active directory, but you have access to the WSS machine via VPN make sure to create an account on the server that matches the same username and password you use on your develop machine, it will simplify a bit the deployment of the assemblies to the WSS website directories and it will be very useful to successfully setup remote debugging.
Let’s start by creating a very simple Web Part:
- Open Visual Studio 2008.
- Create a new C# library project names TestWebPart.
- Add a reference to System.Web.dll
- (Optional) Add a reference to Microsoft.SharePoint.dll if you plan to use the SharePoint Object Model.
- Create a class TestWebPart.cs with the following code:
public class TestWebPart : WebPart
{[WebBrowsable(), Personalizable(PersonalizationScope.Shared)]
public string Content { get; set; }
protected override void RenderContents(System.Web.UI.HtmlTextWriter writer)
{writer.Write(Content);
}
}
- To not reduce MOSS/WSS Security to fully trust all installed assemblies. we must sign our Web Part project with a strong name and add the following line to “AssemblyInfo.cs”:
[assembly: System.Security.AllowPartiallyTrustedCallers()] - If the machines are members of different domains, or you don’t have a domain with active directory at all, on the server machine create an account that matches the one you use on your develop machine (use the same username and password). Make the user member of the Administration group.
- Establish a network sharing on the root folder of the SharePoint website, based on the folder structure we chose I will enable sharing on the following directory: C:\SharePoint\WebApps; make sure you have the right permissions to write to it.
- Add a post-build event to the solution project to copy the dll and pdb files to the bin directory of all the SharePoint website that will use the web part (we have 2 different sites: intranet and internet).
copy /Y "$(TargetDir)$(TargetName).*" "\\WIN-UENR6M3NW8J\WebApps\80\bin"
copy /Y "$(TargetDir)$(TargetName).*" "\\WIN-UENR6M3NW8J\WebApps\www.sharepointtest.com80\bin"
- We now have to tell SharePoint that is safe to use our assembly and the web parts defined in it, to do so we need to modify all the web.config of each website that will use the assembly; so open them in notepad, find the <SafeControls> section and add there the definition for our control:
<SafeControl Assembly="TestWebPart, Version=1.0.0.0, Culture=neutral, PublicKeyToken=3101006faf258fa2" Namespace="TestWebPart" TypeName="*" Safe="True" />
- The last step needed is to enable this Web Part inside SharePoint and make it available to the website, so logon to the website and choose: ‘site action’ -> ‘site settings’, look for the ‘Galleries’ column and click on ‘Web Parts’.
- To repopulate the Web Part galley hit the button ‘New’, select the TestWebPart and then hit the ‘Populate Gallery’ button; if your Web Part isn’t in the list check all the previous steps and perform an iisreset.
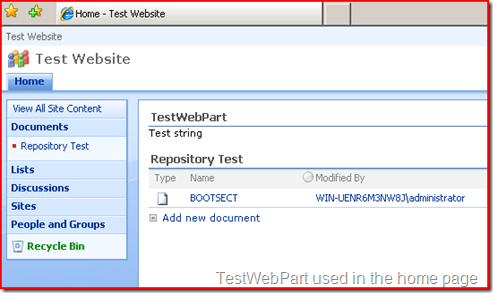
- To use the Web Part on a page, navigate to the page and click ‘site actions’ -> ‘edit page’; you are then free to add it and configure its properties.

Remote Debugging the Web Part
We start with the following scenario:
- SharePoint deployed in a development server machine
- SharePoint website up and running
- No domain and no special users policy active, the Server machine and the development machine are connected by Lan or Vpn.
- Visual Studio isn’t installed on the Server machine.
To be able to use remote debugging you must have Visual Studio Professional or Visual Studio Team System (it will not work with Visual Studio Standard). Since we do not have an active directory to hold our users policy we’ll have to define a user account (with the same username and password on both machines) that will be used to develop and debug; this is needed by the remote debugging monitor to work cause it needs access to both the machines. Here are the steps you have to perform:
- Copy the Remote Debugger Monitor to the Server: go to “C:\Program Files\Microsoft Visual Studio 9.0\Common7\IDE\Remote Debugger”, there you will find 3 folders: ‘ia64’, ‘x64’, ‘x86’ copy to the server the one that matches your server installation.
- Define a new user on the server machine (I used ‘alessandro.giorgetti’) and make it member of ‘Administrators’ and ‘WSS_ADMIN_WPG’ (so it cal also be used as an administrator for SharePoint).
- Go to the folder where you copied the remote debugging monitor and launch it using the newly defined user. You can use the ‘runas /user:alessandro.giorgetti msvsmon.exe’ command from the command line prompt (remember to launch it with administrative privileges) or you can use the Sysinternals utility called “Shellrunas” to have the runas command back in you context menu.
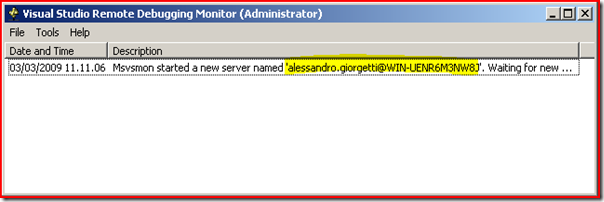
- At this point you’ll have the remote debugging monitor up and running:

- Take note of the instance name (usually it will be in the form: domain\username@servername) cause it will be used later to connect to the server, you can however change it from the ‘tools’ -> ‘options’ menu.
- Open a web browser with an instance of your SharePoint website.
- Log to your development machine and define the same user (if it doesn’t exists) with the same password. make it is member of the following groups: ‘administrators’, ‘debugger users’.
- Add an entry to the “C:\WINDOWS\system32\drivers\etc\hosts” file that will allow to browse the SharePoint website without a DNS server:
in this example 10.8.0.38 is the address of my SharePoint test server.10.8.0.38 www.sharepointtest.com
- Login to the development machine using that user or user the runas feature to launch visual studio under the new account.
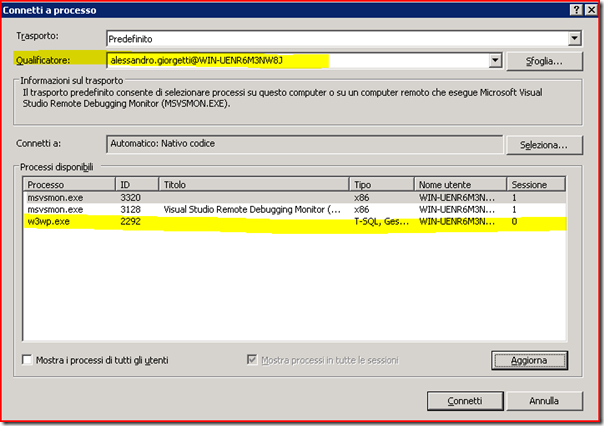
- Open the TestWebPart solution project and chose ‘Debug’ -> ‘Attach to process...’ from the menu; in the dialog box write the remote debugging server name you took before in the Qualifier field and wait for the process list to be updated, after that select the w3wp.exe (or the corresponding IIS process).

(the image is took from an Italian version of Visual Studio) - If you have trouble here and the system ends up saying you do not have enough privileges to debug the application, you’ll have to turn off the UAC mechanism on your development SharePoint server (the option is in control panel, user accounts). You can also try to right click msvsmon.exe on the server and under the compatibility tab check ‘run this program as administrator’, but it didn’t worked for me and I had to disable UAC to allow the debugger to successfully connect to the remote process.
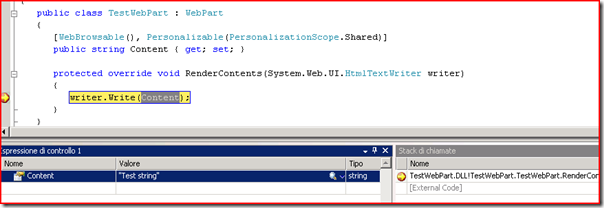
- You can now set a breakpoint on the solution, and when you refresh the website on the server machine you will notice that the breakpoint will be hit:

At this point you are able to remotely debug a SharePoint solution.
See you next time.
Related Content
- Windows SharePoint Services - first setup (26/08/2015)
- SharePoint Services - Setting up a Website with Forms Authentication (26/08/2015)
- Get SharePoint Designer 2007 for Free (04/03/2009)
- VSeWSS: Unable to start debugging.The web server is not configured correctly (09/03/2009)
- WSS / SharePoint: adding filtering capabilities to the CustomListViewWebPart (Current User Filter and others) (09/11/2009)
- More related document (11)

