WSS/SharePoint: Create a Custom ListViewWebPart

The standard ListViewWebPart, while it does a lot of work under the hood, offers quite limited functionalities when it comes to programmatically filter the data: even if you can wire up a filter WebPart that provide multiple values, only the first one will be considered; plus you can set only a single WebPart as the ‘data provider’ for the ListView (and this makes the realization of complex filter very hard).

You can rely on different techniques to accomplish the job:

- using SharePoint designer and create custom pages there (but it’s like hard coding the things and the reusability is minimal).

- you can define a set of views and assign them to different users, but it can be easily done only in MOSS using the Target Audience feature, and you cannot do it in WSS.

- other alternatives I do not know...

I didn’t liked any of these approaches and so I decided to try to customize the ListViewWebPart. You cannot directly inherit from the control (the class itself is marked as ‘sealed’, plus it can use many external resources you never know where they can reside given the structure of SharePoint).

I started the thing trying to use the original control, but there were problems in the way it handled the views..that is to work correctly it needs to refer to an existing view in the database; but in order to apply a custom filter query to that view, you have to call for the ‘Update’ method of the view object. If the user do not have the right permission that operation will fail and you’ll have an ‘access denied, log with another user’ (or something similar) error.

To overcome this I decided to create a brand new View object based on the schema of the current view (or the view the user have selected) and to call its RenderAsHtml() method; the result is a WebPart that act as the original ListViewWebPart, but that you can easily filter and customize (even in WSS).

Here’s the code:

[Guid("b7ea3f7d-b260-4ce8-9fd0-3af5aee8e0d6")]
public class CustomListViewWebPart : System.Web.UI.WebControls.WebParts.WebPart
{
    #region Properties
 
    private string strSourceList = string.Empty;
    private string strViewOfSourceList = string.Empty;
    private string strQuery = string.Empty;
 
    /// 
    /// The List we are displaying
    /// 
    [Personalizable(true),
    WebBrowsable(),
    WebDisplayName("List Name"),
    WebDescription("Pass the name of the List to show")]
    public string SourceList
    {
        get
        {
            return strSourceList;
        }
        set
        {
            strSourceList = value;
        }
    }
 
    /// 
    /// The Default View of the list
    /// 
    [Personalizable(true),
    WebBrowsable(),
    WebDisplayName("View"),
    WebDescription("Pass the name of the View that you want to apply to the List")]
    public string ViewOfSourceList
    {
        get
        {
            return strViewOfSourceList;
        }
        set
        {
            strViewOfSourceList = value;
        }
    }
 
    /// 
    /// a CAML query to filter the object
    /// 
    /// 
    /// in a later revision we will use one or more filter providers to set this
    /// 
    [Personalizable(true),
    WebBrowsable(),
    WebDisplayName("Query"),
    WebDescription("Pass the Filter Query")]
    public string FilterQuery
    {
        get
        {
            return strQuery;
        }
        set
        {
            strQuery = value;
        }
    }
 
    #endregion
 
    public CustomListViewWebPart()
    {
        this.ExportMode = WebPartExportMode.All;
    }
 
    protected override void CreateChildControls()
    {
        base.CreateChildControls();
        
        SPWeb web = SPContext.Current.Web;
        {
            try
            {
                SPList list = web.Lists[SourceList];
 
                // create the toolbar, actually we cannot hide it, we'll need to extend the webpart and those options
                ViewToolBar toolbar = new ViewToolBar();
                SPContext context = SPContext.GetContext(this.Context, list.Views[ViewOfSourceList].ID, list.ID, SPContext.Current.Web);
                toolbar.RenderContext = context;
                Controls.Add(toolbar);
 
                // get a reference to the view we want to use
                SPView webPartView = web.Lists[SourceList].Views[ViewOfSourceList];
               
                // create a new view based on the original one and attach the filter query to it
                // in this way we do not need to modify/update the original element and
                // even a user without updating permissions can use this webpart
                XmlDocument domDoc = new XmlDocument();
                domDoc.LoadXml(webPartView.SchemaXml);
                SPView view = new SPView(list, domDoc);
                view.Query = FilterQuery;
 
                // render the view
                Literal lbl = new Literal();
                lbl.Text = view.RenderAsHtml();
                this.Controls.Add(lbl);
            }
 
            catch (Exception ex)
            {
                // todo: have a better way to report errors!
                Label lbl = new Label();
                lbl.Text = "Error occured: ";
                lbl.Text += ex.Message;
                this.Controls.Add(lbl);
            }
        }
    }
 
    protected override void Render(HtmlTextWriter writer)
    {
        EnsureChildControls();
        base.Render(writer);
    }
}

To use it, just instantiate it on a page and set the ‘List’, ‘View’ and optionally ‘Query’ properties to the right values.

On the next articles of this series I’ll show you how to create custom filters and wire them to an evolved version of this WebPart.

WPF: yet another way to customize buttons controls (and controls in general)

Days ago I needed a way to add an image and some other extensions to the standard button controls in WPF, I did a similar thing in the past in SIlverlight, but I had to rewrite the full control template.

I wanted to avoid this situation, so I started looking around and I found two very good post on the subject:

WPF Control Development - 3 Ways to build an ImageButton

Using Attached Properties to Create a WPF Image Button

Both those approach are good but they didn’t satisfied me in full: bad support for templating in the first case, and too much xaml to write in the second. So I merged both approach and came out with a solution that fulfills my needs:

  1. I created and inherited control
  2. I added some dependency properties to use it in xaml (that is specify the image)
  3. I used the ‘ContentTemplate’ and ‘DataTemplate’ features to define the style of the control (replacing the facto the standard content of the button.

Here’s the new button class:

public class ImageButton : Button

VSeWSS: how to solve the WebNotFoundException

I started using VSeWSS as a support tool to develop a WSS/SharePoint application and I had to face some common issues. Sometimes when you try to ‘build and deploy’ your solution you’ll get this exception reported (in the detailed log that VSeWSS emits):

Microsoft.SharePoint.Tools.WebNotFoundException: No SharePoint Site exists at the specified URL: http://XXXXXX. The Web application at http://sharepntdev could not be found. Verify that you have typed the URL correctly. If the URL should be serving existing content, the system administrator may need to add a new request URL mapping to the intended application. ---> System.IO.FileNotFoundException: The Web application at http://sharepntdev/ could not be found. Verify that you have typed the URL correctly. If the URL should be serving existing content, the system administrator may need to add a new request URL mapping to the intended application.

VSeWSS: how to solve the ‘SecurityException: Access denied’ issue

I started using VSeWSS as a support tool to develop a WSS/SharePoint application and I had to face some common issues. Sometimes when you try to ‘build and deploy’ - hum...this sentence sounds somewhat familiar :D - your solution you’ll get this exception reported (in the detailed log that VSeWSS emits):

System.Security.SecurityException: Access denied.

WPF: force all the validation rules attached to an object to be executed

I’m working on a WPF application that have some validation performed through the standard ValidationRule system employed by WPF at the UI level.

Recently I needed a way to validate (that is check the state and force the execution of any validation rule) full portions of the Visual Tree. The idea was to call a function that, given a DependencyObject would traverse the tree and force the execution of any validation rule attached to a any Binding we can find.

The first step is then find out how to get all the Dependency Properties that an object exposes; I’ve ‘googled’ a bit and found out many solution that use the DependencyObject.GetLocalValueEnumerator() method...unfortunately this one is not useful in my case, cause it doesn’t return values set in templates.

In the end I was forced to use reflection to get the dependency properties of an object and for performances reasons I decided to cache the result of those reflection calls in a dictionary.

The rest of the function is straightforward and it’s a modified version of a routine you can find on the ‘Programming WPF’ book. To force the validation to be performed instead of calling the Validation.MarkInvalid() function I choose to get the binding expression and call it’s update methods which guarantee that the associated error collection of an object is cleared if the state becomes valid again.

Here’s some code:

public static class Validator

UI Prototyping: simplify your life with Balsamiq

Recently I attended the UGIALT.NET Conference and the first session was devoted to How to Design the User Experience, the speaker - Daniela Panfili - clearly stated some good points and she told us how she and her team spend a lot of time interacting with the end user and designing the user interface; the purpose is to try to offer the right functionalities in the right place to maximize the usability of the application, keeping however an eye on the look and feel to have a pleasant interface.

I have to admit I was always been focused in developing the architecture of an application first, that is the usual tasks: design application modules, glue them with an IoC container or a plug-in system, define some communication methods, use patterns like AoP and similar to inject logging function and so on...

Usually I left the interaction with the user as the last thing, or something that only the functional analysts have to care about at start (and if they are good they do their job well, if they are so so or inexperienced you often end up rewriting their job..which is a big loss of time)…in recent times I’ve however started to change my mind especially when I saw what came out from some designs: applications that have all the required features but they are ‘hidden’ or hard to be found by the users…so I started to draw some sketches by hand to figure out how the application should look and work.

The basic idea is to have a better picture of what the user want and how it should use it before starting to write any architectural code; in an ideal situation you should have two different design pipelines: one for the UI and UX and one for the architecture, they both can start work in parallel, while you are working on the generic infrastructure or framework on top of which you develop your architecture.

Having sketches of how the application should look (I’m not talking about astonishing graphic effects or animation, but the general disposition of the elements) also is very useful to integrate the documentation and give the client some immediate feedback on what the project will be.

Doing the whole job by hand can be fast but it has some drawbacks: you need to perform periodic scans of the sketches and put them in your repository, they get messy pretty fast (you don’t have any Undo feature when it come to the good old paper), only one person can have the original copies, and it’s hard for different people to work on the design (especially if they are in different locations).

Having a good tool that allow everyone to draw or modify a sketch is starting to be a necessity in teams that want to develop software seriously, it’s true we have a plethora of Paint-like and PowerPoint-like apps around; but they require skills that not all the developers have or have time to learn.

Here’s where Balsamiq come help us, this tool is specifically designed to allow even non-non professional graphic artists to design and prototype interfaces and functionality pretty fast. It’s very intuitive and easy to use and allows everyone – with a minimal effort – to draw a detailed scheme of what the UI will resemble to.

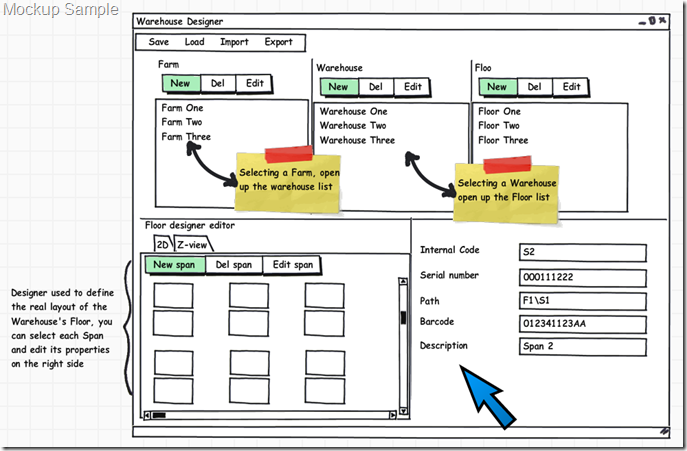
Using a tool like this can also help you realize if you are doing a good job in defining your UI...to test it a bit I tried to replicate an interface I’ve wrote for a warehouse designer tool to be used in a project; down here you can see the result.

BalsamiqWarehouseDesignerMockup

While writing it in WPF I thought it could be a good interface design...well...giving it a second look here I realized that my job, even if it had all the required features, wasn’t good enough and I’m actually looking at how I can improve it.

Balsamiq comes with a quite complete library of common controls and it can be extended easily, there are in-fact a series of template freely available. Balsamiq allows you to add a level of interaction between different mockups and provide links to them, so you can simulate some navigation in the user interface. You can also export the mockup design in XML to process it with your custom utilities or generate a Flex application (a service offered by a 3rd party company).

In short a tool that can help raise your productivity, especially in the early stages of developing of a new project.

Related Content