In my current project I needed to use a dynamic Menu Control (a completely declarative approach hardcoding the structure in XAML wasn’t a good fit for my application cause I need to dynamically add, remove, enable and disable menu items). Since Silverlight doesn’t support a menu control yet I had 3 options:
1- look for a 3rd party component (which actually can be an expensive solution if you need only a single control)
2- look around the web to see if there’s something free to use as a starting point
3- build it from scratch.
I tryed the way number 2 first but I wasn’t able to find anything, so I gathered some information and started to build it from ground up.
Control requirements:
1- a basic menu control which will expose Add() and Remove() functions to manage menuitems.
2- the menu will be hosted in a menu bar control which will display the menu items in an horizontal fashion, each ‘level 0’ menu can have sub items (that is the drop down with some menu items in it), a sub menu cannot have children (yet).
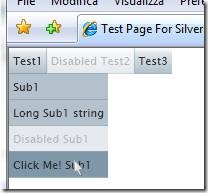
Here’s the final result at this stage:
Let’s have a look at the solution.
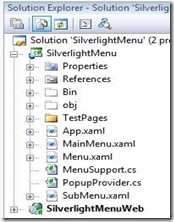
The final control is actually composed of 3 XAML files and 2 support files:
- MainMenu.xaml – contains the definition of the menu bar that will host all the ‘Level 0’ menu items, actually it’s nothing more than a stackpanel with horizontal orientation.
- Menu.xaml – contains the definition of Menu Items hosted in the MainMenu control, the menu is actually just a button contained in a Grid, its template was completely redefined using blend to obtain a more ‘flat’ appearence.
- SubMenu.xaml – contains the Menu Items that can be nested in a Menu control, again it’s a simple button with its template redefined.
- PopupProvider – defines the class that manages the popup menu display logic, the original code was taken from Chuck Kinnan article (http://www.codeproject.com/KB/silverlight/Silverlight_Popup_Logic.aspx); some fixes were made to it.
- MenuSupport – contains interfaces declaration and some support classes.
Going on a complete code analysys is beyond the scope of this article, mainly cause it’s extremly simple to follow, so just focus on why we made soem choices:
We have different classes for ‘Level 0’ and ‘Level 1’ menu items cause we need different graphical representation for them, this way we leave some room for customize it.
Why use buttons: mainly cause they already support all the state needed by a menu: normal, hover and pressed state (some states were removed like the focus ones).
The menu is actually displayed using a Popup which contains a StackPanel with vertical orientation, both the Popup and the StackPanel are created by code in the AddMenu() function exposed by the Menu control for two reasons: 1- to save resources (if a menu do not have childern it’s useless to create them); 2- it seems there’s a bug of some sort in how the silverlight runtime manages the Popups, if they were declared in Xaml, with a name given to them, and you dynamically adds the controls to the bar when you try to open 2 or more popups at the same that have the same name (even if they have different parents in the visualization tree) you get an exception, this doesn’t happens if you create the controls by code.
here’s the AddMenu() function
        public void AddSubmenu(SubMenu sm)
        {
            if (p == null)
            {
                p = new System.Windows.Controls.Primitives.Popup();
                pnl = new StackPanel();
                p.Child = pnl;
                MenuLayout.Children.Add(p);
            }
            pnl.Children.Add(sm);
            sm.ParentMenu = this;
            EnablePopupProvider();
        }
Menu and SubMenu items have a ParentMenu property to trace who’s his parent cause when you click on a SubMenu you have to close the popup which is holded by it’s parent control; the first attempt to identify a parent menu of a submenu was made by using a while cycle looking at the ‘Parent’ propery of each control that is the visualization tree until we found a ‘Menu’ or ‘SubMenu’ control, so for a Level 1 SubMenu the sequence could have been something like this:
MenuButton –> Grid –> StackPanel –> Popup –> Menu Control
but it came out that the parent property of a StackPanel inside a Popup control returned null..so we were forced to add a ParentMenu property and populate it on the Add() and Remove() functions.
The last thing to note was a ‘Bug’ in the state management of the control, when you use a menu you usually open it up by clicking on the menu voice which will open the popup, then you select a subitem hovering on it with the mouse (the control changes its state to ‘mouseover’) then you click on it (‘pressed’ state); at this point, on the internal button click event 2 things happens: the subitem ask it’s parent to close the menu popup and a MenuClick event is raised for the application to handle it.
But the popup closes itself when the mouse is STILL over the submenu item and the internal control will retain its ‘mouseover’ status (the menu is highlighted) and when you open the popup again you get the last item you clicked on still highlighted.
The solution is to ask the VisualStateManager to change the state of each control to ‘Normal’ each time the popup is shown, so we add the call on the Loaded event (which is called every time we open the popup) of the SubItem control, here’s the code:
        void SubMenu_Loaded(object sender, RoutedEventArgs e)
        {
            //force the visualization to switch to the normal state to avoid the
            //hovering bug: the control is in the hover state when we ask to close
            //the popup that contains it, if we do not change the state manually
            //it will retain the 'mouse hover' status
            if (IsEnabled)
                VisualStateManager.GoToState(MenuButton, "Normal", true);
        }
In the end, let’s have a look at how you can use it:
            //Dynamically buildup a menu
            Menu m1 = new Menu("Test1");
            m1.AddSubmenu(new SubMenu("Sub1"));
            m1.AddSubmenu(new SubMenu("Long Sub1 string"));
            SubMenu sb1 = new SubMenu("Disabled Sub1");
            sb1.IsEnabled = false;
            m1.AddSubmenu(sb1);
            sb1 = new SubMenu("Click Me! Sub1");
            sb1.MenuClick += new MenuClickEventHandler(sb1_MenuClick);
            m1.AddSubmenu(sb1);
            Menu.AddMenu(m1);
            Menu m2 = new Menu("Disabled Test2");
            m2.IsEnabled = false;
            m2.AddSubmenu(new SubMenu("Sub2"));
            m2.AddSubmenu(new SubMenu("Sub2"));
            m2.AddSubmenu(new SubMenu("Sub2"));
            Menu.AddMenu(m2);
            Menu m3 = new Menu("Test3");
            m3.AddSubmenu(new SubMenu("Sub3"));
            m3.AddSubmenu(new SubMenu("Sub3"));
            SubMenu sb3 =new SubMenu("Sub3");
            m3.AddSubmenu(sb3);
            Menu.AddMenu(m3);
This is only the first version of this control, and there’s room for LOTS of improvements (like adding a child menu to each submenu; and a better templating system), but nonetheless it’s a good starting point for your own menu control.
Example Solution:
Related Content
- Silverlight: Dropdown Menu Control (10/07/2008)
- Silverlight: How to Add a Context Menù to a FrameworkElement (26/08/2015)
- Silverlight: simulate a 'Windows' desktop application - part 1 (26/08/2015)
- Silverlight: Custom Buttons with Templates (09/01/2008)
- Silverlight: The Power of (26/08/2015)
- More related document (42)


