As my first real experiment in building a Silverlight control, I wanted to realize something that could permit me to offer to the users a windows-like experience application hosted in the browser, so I started wondering how difficult was to implement a control that could host other silverlight control and even pages, this control should then act as a 'real' window and can be dragged on the surface (over other controls) and with resizing and closing capabilities, plus I want to give the Window a look similar to WIndows Vista Aero Desktop windows.
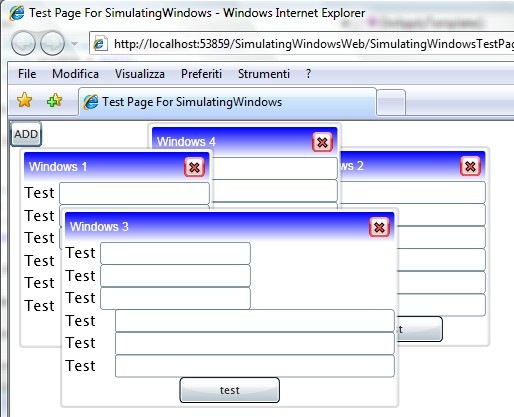
To be honest Silverlight is very flexible and its templating capabilities made the task a lot simplier than I tought at start, here's what we want to obtain:
This 'tutorial' will be divided in a series of 3 articles that describe:
- the basic idea and the creation of the control.
- implementation of dragging capabilities.
- implementation of resizing capabilities.
The source code that comes with each part will however include the complete example solution (since I'm too lazy to divide it in parts), so let's get started.
There are a bunch of articles out there that describes how to create a user control and how to skin it so I won't dig deep in that; one of the best and very simple to follow is: 'Craft Custom Controls for SIlverlight 2' by Jeff Prosise (http://msdn.microsoft.com/en-us/magazine/cc721611.aspx), so use it as you main reference in creating your new controls.
Let's point out the ideas that are behind the Window control:
To move the windows around and resize them freely we need to use the 'Canvas trick' and place an outside Canvas that encapsulate any other controls on the page in which we want to use the windows, this is a must since I've not yet found a way to inject dinamically a canvas on a preexisting page.
We then need 2 classes basically: a Window class that will handle the windows features and a WindowManager class that act like a supervisor for all the windows hosted on the page, this is a very simple class that act like the operating system do with normal windows...it creates them and when he receive the WM_CLOSE message (placed in the message pump by the windows) it closes them.
We are forced to implement our own mecanics since silverlight do not offer any native way (yet) to handle windows like we want to do, we also do not have a message pump to use so we will use the notification events that will be raised by the Window.
The Windows control is quite simple to realize at start, its main template will be contained in the Generic.xaml file of the solution and will be automatically loaded for each instance since we specify the DefaultStyleKey property in the constructor of the class, the template will define some pure graphical controls and 4 named controls that will represent:
- the window surface itself - used for resizing the control
- the caption bar - used for dragging the window around
- the caption bar text
- the close button.
The style for the close button is defined in the App.xaml file and redefines the template of a normal silverlight button, you can use Expression Blend to take a look at both files and edit the templates.
We will get a reference to those control when the template will be loaded by the runtime (just before rendering it) in the overridden OnApplyTemplate() function:
        /// <summary>
        /// Gets called once the template is applied
        /// </summary>
        public override void OnApplyTemplate()
        {
            base.OnApplyTemplate();

            window = GetTemplateChild("PART_Window") as Grid;

            captionBar = GetTemplateChild("PART_CaptionBar") as FrameworkElement;

            captionText = GetTemplateChild("PART_CaptionText") as TextBlock;
            captionText.Text = _Caption;

            Button closeButton = GetTemplateChild("PART_CloseButton") as Button;
            if (closeButton != null)
                closeButton.Click += new RoutedEventHandler(closeButton_Click);

            DefineDragEvents();
            DefineResizeEvents();

            Canvas.SetZIndex(this, currentZIndex);
        }
We also have to provide the window with an event that will be raised whrn the user click on the close button.
        public event EventHandler Closed;

        public void Close()
        {
            this.Visibility = Visibility.Collapsed;
            //raise the closed event
            if (Closed != null)
                Closed(this, EventArgs.Empty);
        }

        void closeButton_Click(object sender, RoutedEventArgs e)
        {
            Close();
        }
the handler will hide the window and notify the manager to take all the actions it has to do to remove the window from the surface and destroy it.
An intereresting thing to note is how it was implemented the Caption property, used to set the title of the window:
        public string Caption
        {
            get { return (captionText != null) ? captionText.Text : _Caption; }
            set
            {
                if (captionText != null)
                    captionText.Text = value;
                else
                    _Caption = value;
            }
        }
        private string _Caption = "";
It may happen that you want to get or set this property before the template is actually loaded, so you have to
bufferize the value and apply it later in the OnApplyTemplate() function.
The WindowManager class is extremely simple, it will get a refence to the Canvas in which any window will be placed and will offer function to create new windows specifing the control that will be hosted inside and the position where to display it. It will internally subscribe to the Closed() event raised by the windows and will automatically remove them from the surface whenever they are closed.
    /// <summary>
    /// Class that handles the creation and destruction of dynamic windows
    /// </summary>
    public class WindowsManager
    {
        private Canvas _canvas = null;

        /// <summary>
        /// creates the manager and stores the canvas to which attach the windows
        /// </summary>
        /// <param name="surface"></param>
        public WindowsManager(Canvas surface)
        {
            _canvas = surface;
        }

        public Window ShowWindow(FrameworkElement content, string caption, Point location)
        {
            Window w = new Window();
            w.Caption = caption;
            w.Content = content;
            w.Closed += new EventHandler(w_Closed);
            Canvas.SetLeft(w, location.X);
            Canvas.SetTop(w, location.Y);
            _canvas.Children.Add(w);
            return w;
        }

        ...

        void w_Closed(object sender, EventArgs e)
        {
            //remove the object from the childern colelction and dispose it dispose the object
            Window w = (Window)sender;
            _canvas.Children.Remove(w);
            //todo: dispose the object
        }
    }
You have a series of options on how to use this control, you can define it directly in xaml:
    <Canvas x:Name="LayoutRoot" Background="White">
        <ctrl:Window Width="200" Canvas.Top="100" Caption="Test 0">
            <TextBlock>TEST</TextBlock>
        </ctrl:Window>
        ...
Or you can create them by code using the WindowManager class.
    public partial class Page : UserControl
    {
        public Page()
        {
            InitializeComponent();
            this.Loaded += new RoutedEventHandler(Page_Loaded);
        }

        void Page_Loaded(object sender, RoutedEventArgs e)
        {
            wm = new WindowsManager(LayoutRoot);

            this.btn.Click += new RoutedEventHandler(btn_Click);
        }

        int i = 0;

        void btn_Click(object sender, RoutedEventArgs e)
        {
            i++;
            wm.ShowWindow(new WindowContent(), "Windows " + i.ToString(), new Point(100, 100));
        }

        private WindowsManager wm = null;
    }
That's all for this part, see you for the next ones.
The complete sample solution:
Related Content
- Silverlight: Custom Buttons with Templates (09/01/2008)
- Silverlight: How to Add a Context Menù to a FrameworkElement (26/08/2015)
- Silverlight: The Power of (26/08/2015)
- Silverlight: Dropdown Menu Control (10/07/2008)
- Silverlight: how to build a simple Menu Control (26/08/2015)
- More related document (42)